
Welcoming new members
Welcome message, member role and anti-bot verification (button or captcha), all in a single panel.
On this page
When someone joins your server, the bot can:
- welcome them, in a channel and/or by private message;
- check they are not a robot before opening the server to them, with a button or a captcha;
- give them the member role once they pass the check.
Everything is set up in a single panel, with +join settings.

In short
- Type
+join settings. - Write your welcome message and choose its channel.
- To protect the server: choose the member role, then Verification or Captcha.
The panel
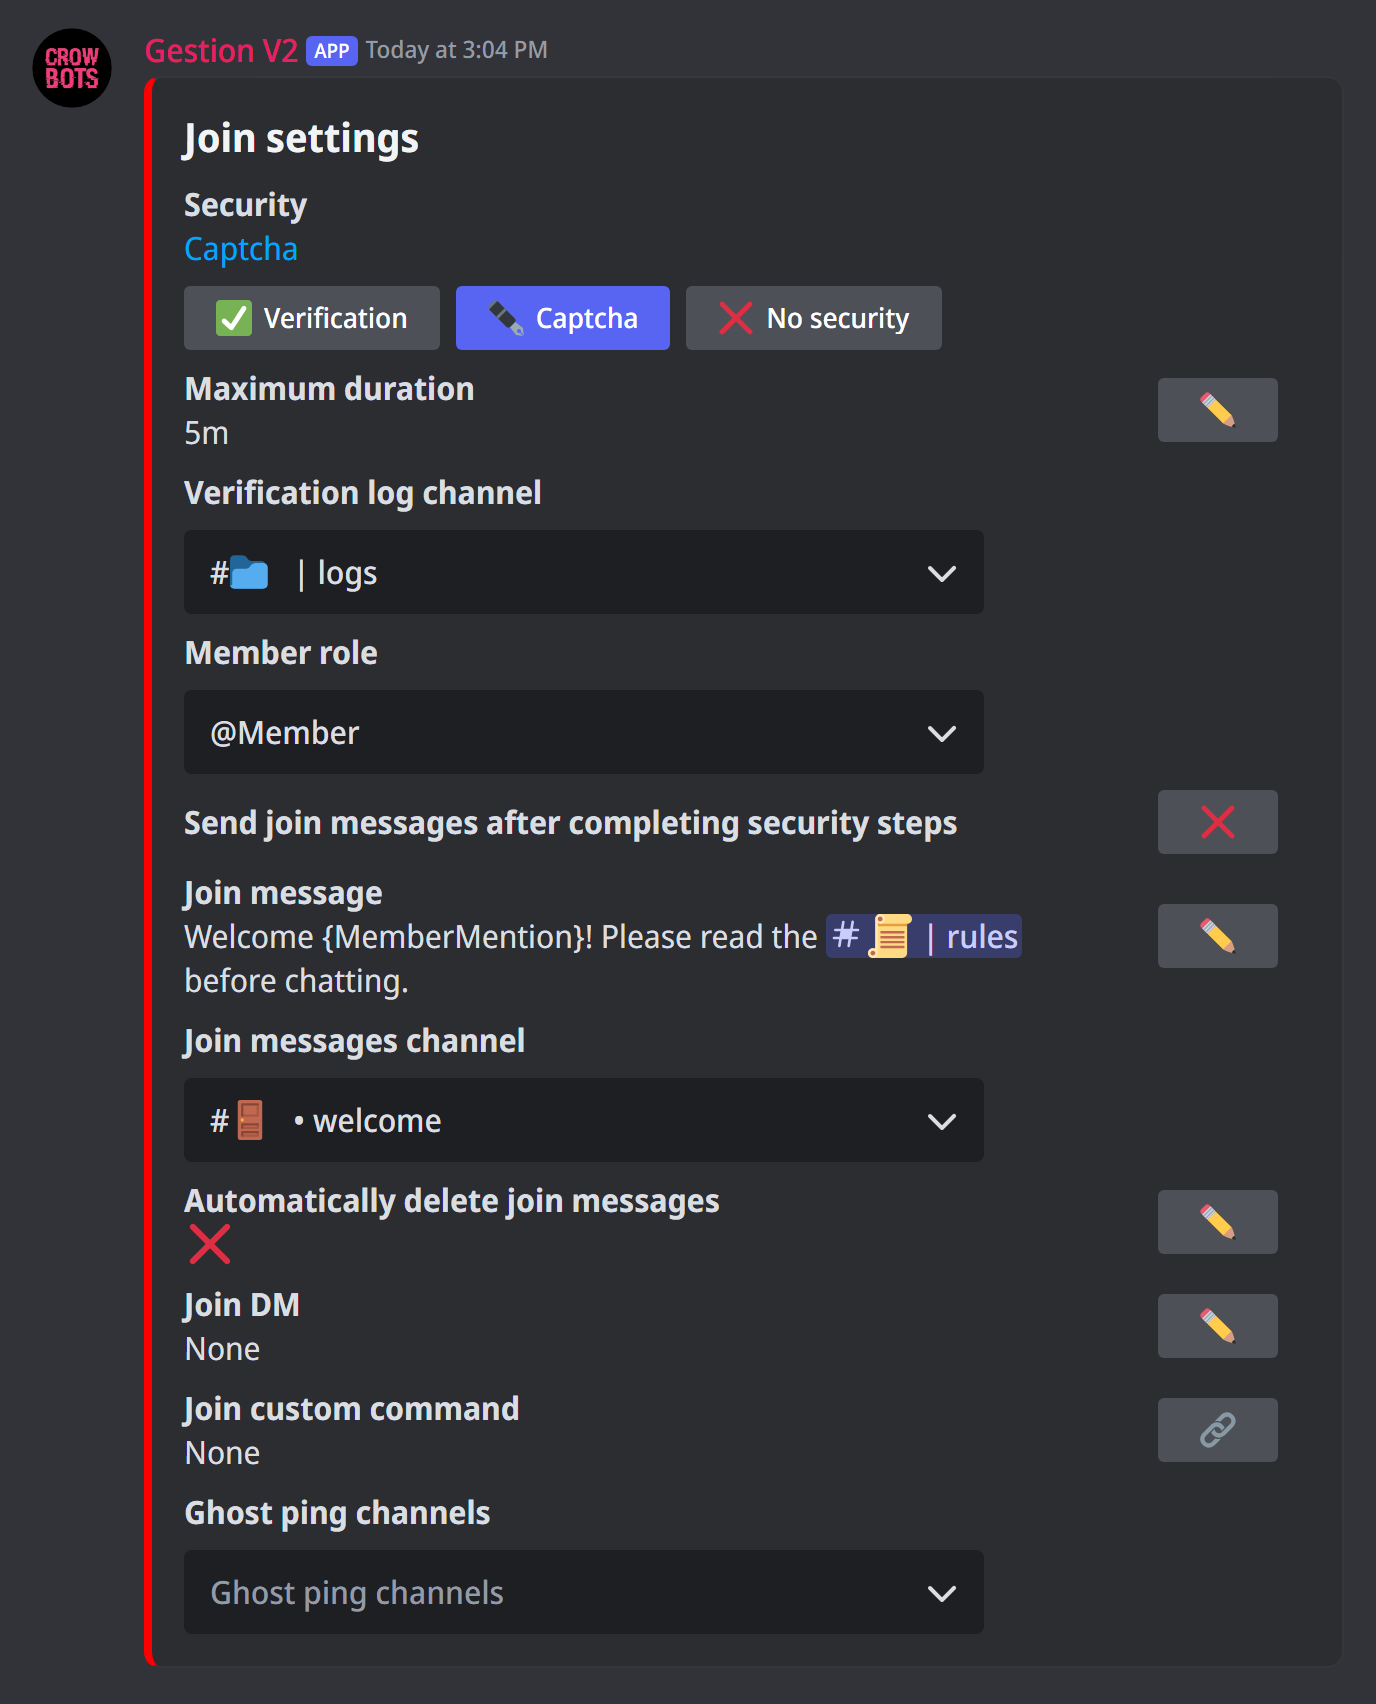
Type +join settings. The panel shown here appears: each setting is changed right from the panel, and saved at once.
- The ✏️ pencils open a small window to type a text or a duration.
- The menus pick a channel or a role.
- The ✅ / ❌ buttons are switches.
Step 1: the welcome message
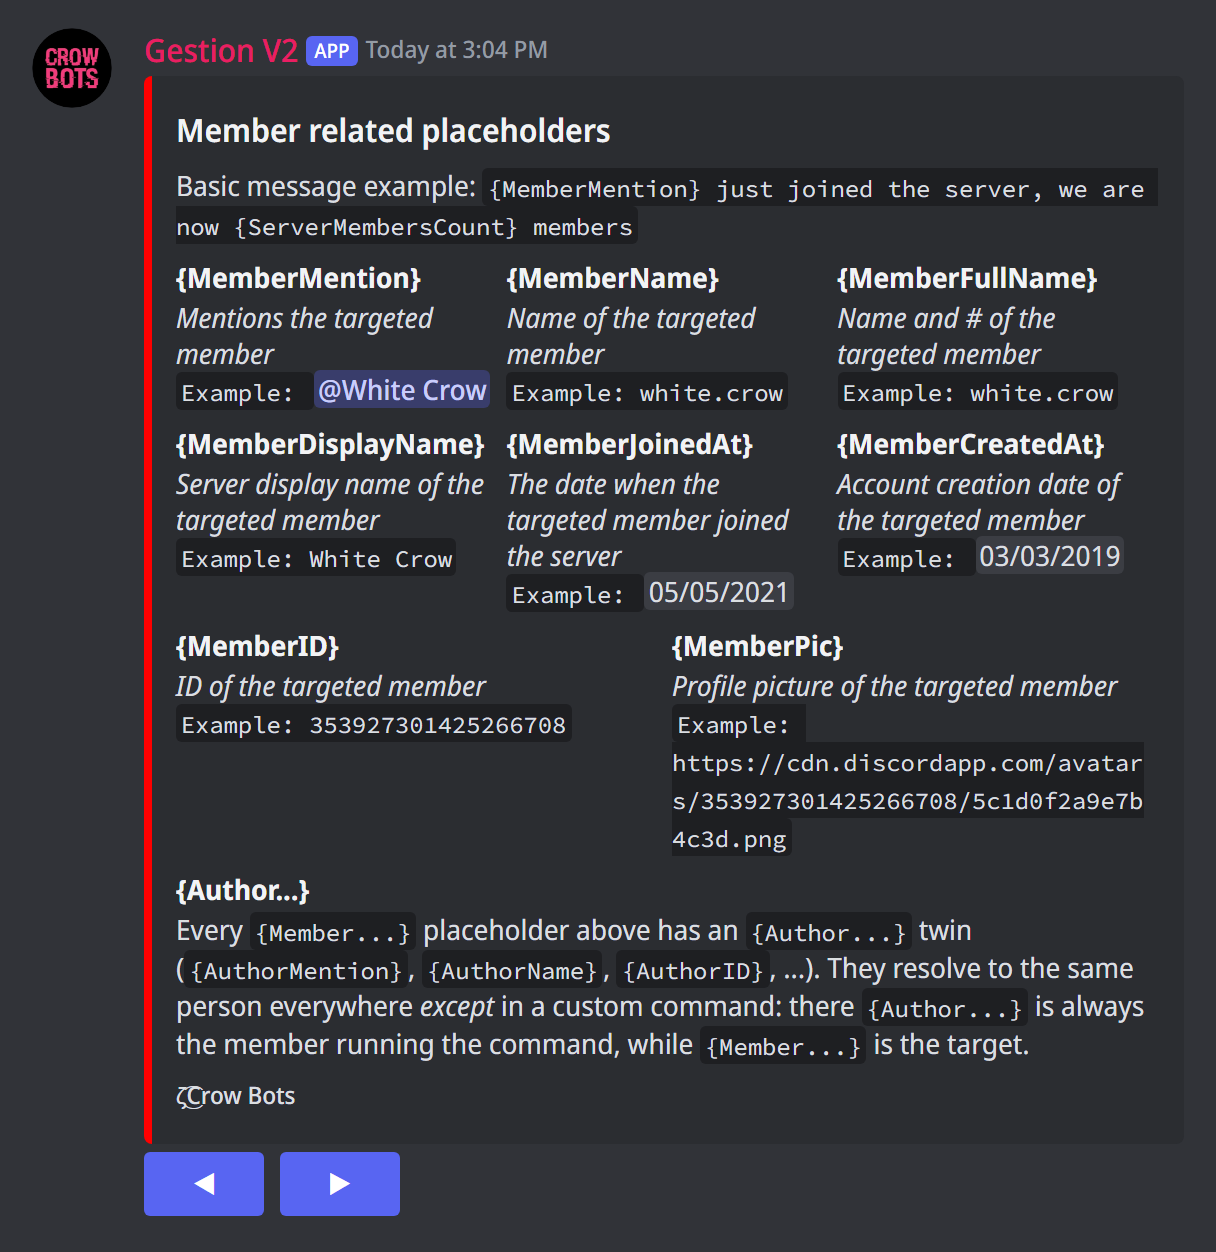
- Click the pencil next to Join message and write your message, for example:
Welcome {MemberMention}! Please read the rules before chatting. - Choose its channel under Join messages channel.
The words in braces are variables the bot replaces: {MemberMention} mentions the new member, {ServerMembersCount} gives the number of members… +help msg shows the full list.
Other useful settings:
- Automatically delete join messages: the message disappears after the delay you choose (15 minutes at most), so it doesn't clutter the channel;
- Join DM: a message sent privately to the new member;
- Ghost ping channels: the bot mentions the new member in these channels and deletes the mention at once. The member gets a notification that leads them to those channels (the rules, for example).
To go further, Join custom command runs a custom command instead of the welcome message: an embed, buttons, roles…
Step 2: keep robots out
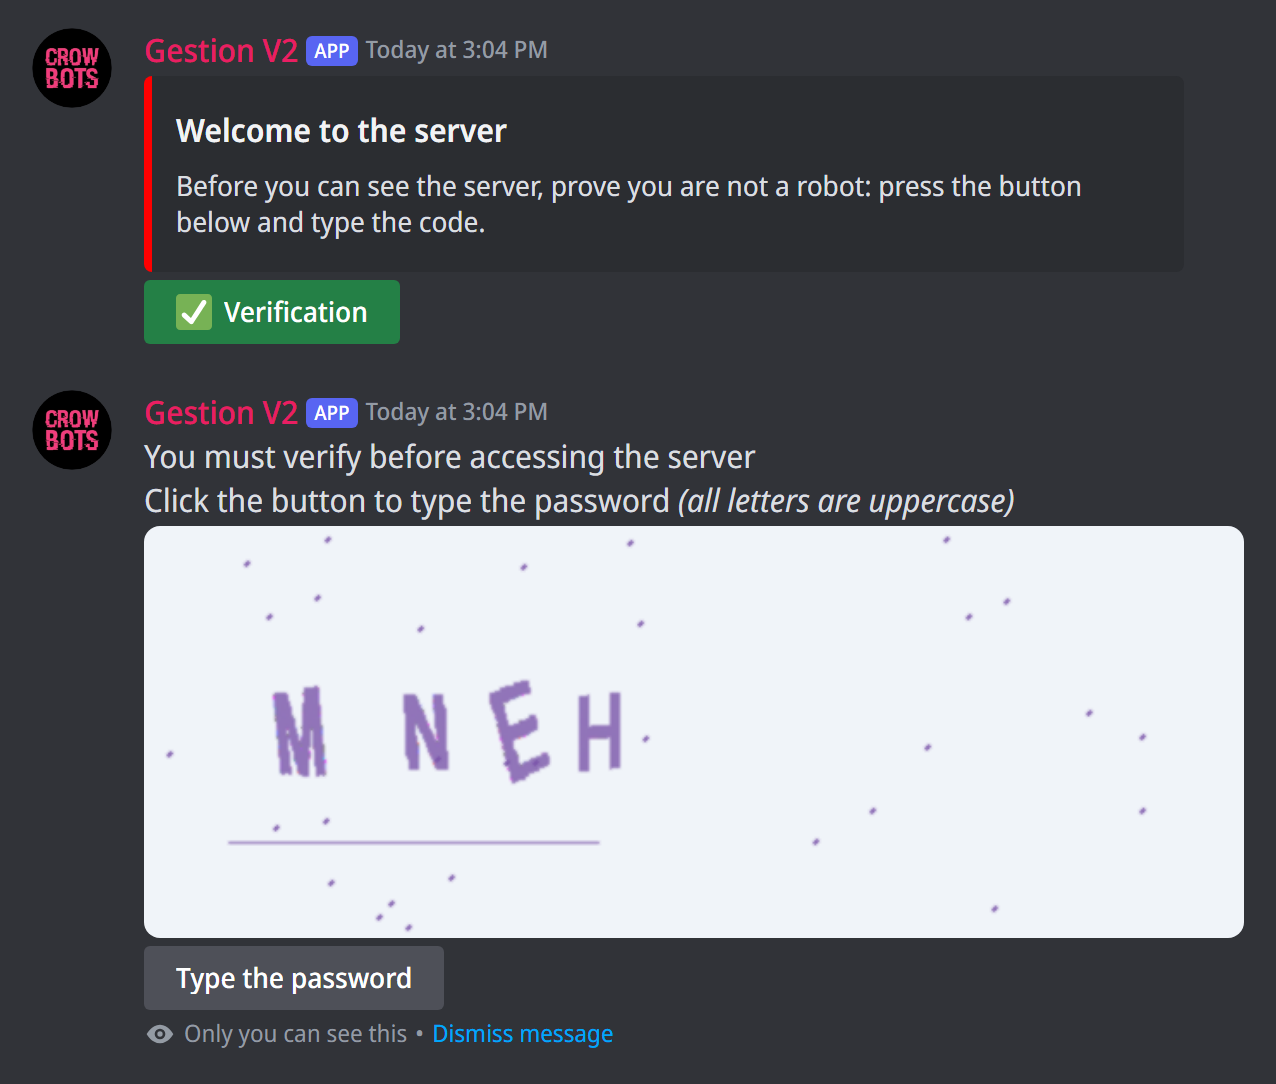
Raids often come from robot accounts. Security stops them at the door: the new member has to click a button before getting the member role and seeing the server.
Two levels:
- Verification: a single click on the button is enough;
- Captcha: the button shows a picture with a code to type back. A wrong code kicks the member. Safer against robots.
Setting it up
- Prepare the verification message. Create a message with
+embedthat explains what to do ("Click the button to enter the server"), in a channel new members can see. - Choose the member role in the Member role menu: it is the role that will give access to the server.
- Click Verification or Captcha. The bot asks you four questions in the channel:
- the link of the message prepared in step 1 (right-click the message, Copy Message Link);
- the button's text (for example Verification);
- the button's emoji;
- the button's colour, one of four. - The button appears under your message: you're done.
Extra settings:
- Maximum duration: a member who hasn't passed the check in time is kicked (for example
10m).0means no limit. For a captcha, keep it short. - Verification log channel: the bot reports there the members who fail or take too long.
- Send join messages after completing security steps: the welcome message and the ghost ping wait until the member is verified.
- No security turns verification off.
Hide the server from unverified members
Don't forget
The bot does not hide your channels by itself. Without this, an unverified member sees your whole server.
In your Discord server settings:
- For the
@everyonerole, remove the View Channels permission. - Give View Channels to the member role.
- In the verification channel, allow
@everyoneto view the channel and read message history, but not to send messages.
Tip: set the permissions on your categories, then type +sync all: every channel takes the permissions of its category.
Members leaving
+leave settings opens a similar panel for departures:
- Leave message and Leave message channel: for example
{MemberName} has left us.The variables are the same (+help msg); - Automatically delete the leave message: after a delay of 15 minutes at most;
- Delete messages from members leaving: the bot erases the leaving member's messages from the last 7 days (by banning then unbanning them at once, which needs the ban permission). It applies to a kicked member too.
If it doesn't work
- "I cannot access the channel of this message" or "Invalid message link": check that you pasted the message's full link, and that the bot can see that channel.
- The button isn't added: the message must have been sent by your bot (create it with
+embed). - Verified members don't get the role: in the server's role list, the bot's role must be above the member role.
- New members see the whole server: see Hide the server.
Every command
Each command of this guide, with its arguments, its default level and examples: Receiving new members and Departure of a member.